Saturday 20 August 2011

Bags, Bugs & Bikes.

Been a Busy "B" Lately.
Bags
A Draw Corded Ditty Bag.
I was asked if I could create a standard sized bag with a hemp draw cord by some folks in Canada, and yes; I know I said I was not going to do this type of work again, but as I happened to have a couple of unfinished bag bodies, and also because I find it hard to say No! I got to work, and below is what I came up with from my brief.
The folks from Canada never got back to me; but luckily the bag has now been sold to another more deserving person :-)
 
Hand seamed in 12oz Cotton Duck canvas, with 6 hand sewn grommet eyelets. 

Threaded with a Hemp draw cord, the ends joined with a doubled Bosun's Lanyard knot, and finished with a seizing in waxed Hemp twine.

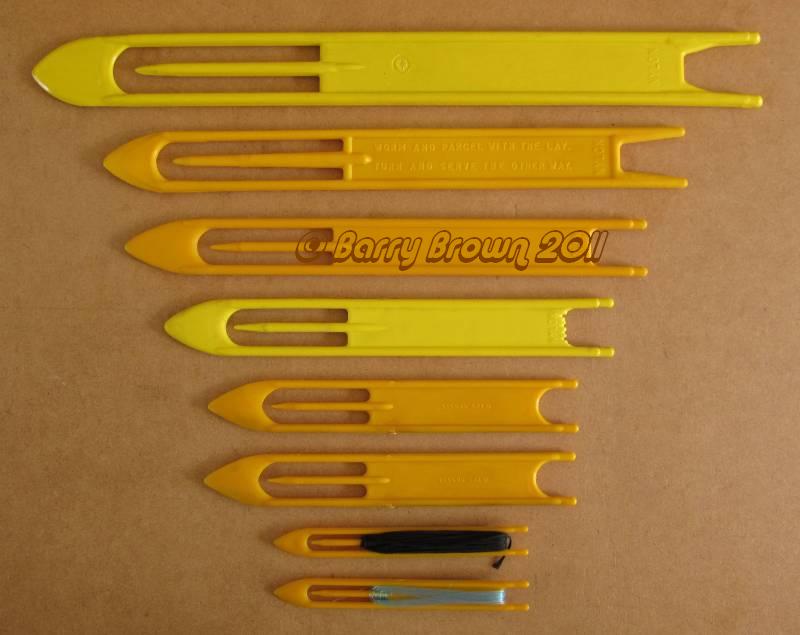
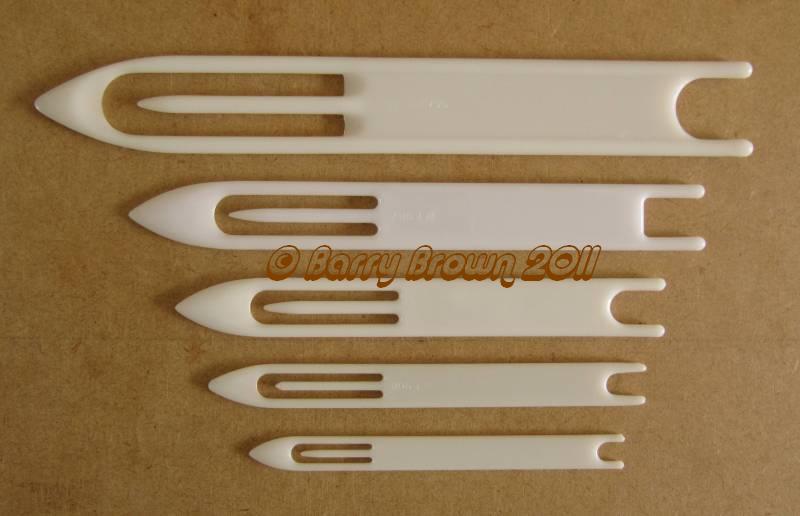
The sliding closure; or puckering knot is a single strand Mathew Walker knot, made with my own hand laid Hemp twine; and sized with a natural sealer. 

Some of the tools of the my trade.

Puckered up and ready to go.


Bugs.

In between jobs I decided to do a little R&R in the garden; and whilst minding my own business a little Grass Hopper hopped over for a chat, before gettign down to the business of making little Grass Hopper's with his mate; whom was keeping an eye on her mate from the adjasent Rose.


& Bikes.
And on to the business of serious fun making!
I have been fetteling with my race / road training bike over the past few weeks, I still have a way's to go yet but this is what I have done so far.

I concentrated mainly on the rear wheel and wheel disks, the original Carbon fibre moulded disks I made; and had great success with; actually winning races in my class ;-) have now been passed on and I set about building a whole new rear wheel, the main reason for a new wheel was to trim a little weight off, quieten th e thundering noise I got every time I hit a bumb; and that the original rim did not have enough surface area for attaching the fabric covering.

The covering is is a very light weight ripstop nylon which is stretched and bonded to the rim before being sealed with cellulose.

here on the non drive side you can see the foil tape patch that gives access to the valve stem for pumping the tyre, the patch make the wheel more aerodynamic than if it was left with the gaping hole in it.

I then got down to the business of comfort and made a new air mesh padded seat pad, and pillow neck rest from the same materials, and I can confirm that it is too comfortable, I have been spotted napping on several occasions whilst out and presumably training ;-)
I could not help myself and had to add a nice dimpled look to the pad very cushy.

I still have the new bars I made to fit, which include a whole new brake and gear operating system, some serious chopping and modding going on there.
more to follow soon?

Take care,
Barry ;-) 

Monday 4 July 2011

Bag To The Future!

How Do All ;-)

A bit of a departure from the expected Rope & Canvas; but no less interesting, for me in any case.
I started racing my Laid Back (Recumbent Cylce) in 2010 with the British Human Power Club, but as I have no other transport; I had to rely on outside help to get my bag of bits to the race track, later in the year I purchased a single wheel trailer which made it easier for me to get to my local circuit with all of the unnecessary crap I thought I needed to take.
Problem with the trailer is that to travel further a field would mean travelling with the bike and trailer on public transport, not an easy task getting on and off trains or navigating stairs with both items.

After seeing a set of saddle bags that fellow racer Dave T had slung over his seat and hearing that he travelled all over the country to races by train not to mention the fact he lives in the arse end of the county; down Cornwall way, talk about commitment (Hero)  ;-)
Here is a picture of Dave's bike and saddle bags; taken by me at Reading last month.

Any how I decided this year I wanted to get to more races and a set of bags like that would be just the ticket.
I first started out travelling to a race in Reading slinging a pair of Ortlieb canoe bags on either side of the seat which worked handsomely; but lacked the convenience of proper securing straps or zips to get at my stuff whilst attached to the bike still.
After making a couple of prototype designs using ideas from the afore mentioned Hero racer's bags and also details kindly given by another fellow racer Barney H; I decided the shape these guys were using did not suit my set up and the bags seem to slump under my seat, where as the cylinder shaped canoe bags seemed to sit nicely and make good arm rests too, just like a rolling armchair ;-)
Well this is where I am at now; with a  nice set of bright Orange, Polyester reinforced PVC saddle bags.
I can just sling these over my seat and ride. there is no need to have a rack mounted as the bags are supported by the seat, and the bags are joined three webbing straps.
When I get to the train station I just whip the bags off and throw them over my shoulder using one of the end straps as a shoulder strap. 

There are 3 side compression straps, so should I wish to I can carry extra items, like a full sized track pump or whatever. I have that option, the centre strap has a side release buckle for easier access to the main zip opening.

The bags sit fairly high up on the seat and close to the body so don't affect the ride of the bike or create to much drag, definitely and improvement from the energy sapping trailer with pannier bags on it.

I did think that bags like this would just swing about wildly from side to side under the seat when cornering, but they are completely stable with no noticeable movement. now all I need to add is a cup holder  ;-)


The ends on the bag bodies are hand seamed as this is easier to do by hand than machine, and gives a better and stronger finish, in my opinion anyway,

The volume of each bag is exactly 14.034 litres  making for a handy 28 litres total carrying space, same size as the average day pack.

I took some of the design inspiration from my North Face, Base Camp Duffel's, of which I have several; now battle scarred, but still going strong, a testament to their reliability and build quality, lets see if my bags last as long ;-)
Maybe at some point I will add a detachable shoulder strap, or dedicated grab handles,

Take care,
Barry ;-)

Tuesday 3 May 2011

Net Making Tools (p2)

Here is another selection of tools I use for net making, Including Netting Needles, a Needle Winder and a Netting Stand Click on the pictures to see them full size.

Netting Needles or Shuttles.
OK, I admit it; I have a Netting Needle fetish ;-)
Here is a selction of the needles I have in my collection, all are manufactured from various plastics. Sorry to all the wood purists out there that like to make their own; maybe next time I will have some wood needles to show.
By the way if you have never made a wood needle for yourself, I can highly recommend doing it, you will learn a lot by making your own; and there is nothing quite like making an piece of netting with the tools  that you have also made.

Here are some injection moulded Nylon needles, in 6, 10,  12, 14, 16 and 20 inch lengths.

 A well known passage molded on one of the needles pictured above, though what the words have to do with net making is beyond me, obviously designed by a knot tyer that could not think of something netting related to have molded into the needle ;-) I like it non the less though.

Norwegian Netting Needles, from Norway just incase you were wondering.
These are my favorite needles, made from Acetal, an engineering plastic; which is very strong and hard wearing, I have many sizes of these varying from 6.5mm wide x 100mm long, up to 32mm wide x 310mm long. the largest of which I use for my Hammocks and normally have 30 of them filled and ready for action to make each hammock body.
I do keep a large stock of these needles for sale; but they are not cheap.

 Toka Needles, in 8, 10, 12, 14 and 27 mm widths and vary from 5.5 - 9.5 inches long, I don't bother with these much; though the smallest size is great for making small mesh netted items.

Some more molded Nylon needles, I don't like these much as they have a short body section so don't hold very much twine, these needles are in 5, 6, 7, 8 and 10 inch lengths.

 Glass reinforced Nylon? needles from Loomis, U.S.A. same pattern as the Norwegian needles but in my opinion they are not nearly as nicely made.

Some basic plastic needles in 6, 8 and 10 inch lengths, the plastic is a little more flexible than Nylon but the design of these needle is very well thought out; having a long tongue which touches the top of the opening; they will not spill twine when dropped, and they also hold a fair amount of twine, and I prefer these to the Nylon types.
I use these needles for workshops and teaching, and also keep a fair stock of them for sale.

Some small Nylon needles which I bought at a knot tying meeting; I only bought them because I could not find anything else I wanted; and hated having to go away empty handed.
These are 6" long and the body is slimmed down allowing a larger amount of twine to be wound on the needle without bulking out too much.

These plated steel needles are used for very fine decorative and Guipure netting, these particular needles are cheaply made and tend to have burs or plating defects which can catch on the twine being used, you can buy good reproduction brass copies of this type of needle but they are fairly pricey, I am not really into doing this type of netting, but the finished articles can be very beautiful indeed.

You can never have too many needles, OK so maybe I have a few more than I really need, but when making any piece of netting; I may have up to 25 or 30 needles filled and ready to use, there is nothing I hate more than having a needle run out of twine when I am going at full steam, and having to start winding another needle full of twine, better to have enough wound up before starting on your project.

 Needle or Shuttle Winder.

My; now not so Top Secret Weapon! and before anyone asks, I can not make you one; sorry, I no longer have access to the tools and materials to do this sort of work now.

The device will only work with Norwegian style needles that have a "H" or "I" beam type cross section.
I can fill any size of needle I have in seconds, and winding up many needles is no effort at all.
Here pictured with a 12" Norwegian needle

The Netting Stand.

This netting stand is based on a design used by net makers on the island of Vinalhaven in Maine, U.S.A and is described in the book "Down East Netting" by Barbara M. Morton.

The stand is used for braiding (or knitting) small net items such as Lobster trap heads (entrances) and bait bags to go inside the traps.

The small box at the bottom of this stand has weights in it to stop the stand from being pulled over whilst pulling the knots tight, the top box is for holding spare needles and mesh sticks (Gauges).
The netter or group of netters would sit by the stand and work from a hook or in this case a steel rod at the top of the stand.

The Netting Stand in use.
Giving a Net Making work shop at the 25th Anniversary of the IGKT in Fareham 2007.

Take care,
Barry ;-)


Tuesday 15 March 2011

Net Making Tools (p1)

Here are a selection of the tools I have made for net making, Including Mesh Sticks/Gauges, Portable bench or table clamps. and various pieces to make life a little easier. Click on the pictures to see them full size.

Mesh Sticks/Gauges.

I have made many sets of Mesh Sticks in various materials including Wood, Plexi Glass, Steel and Stainless Steel.

Below is my current favorite set of gauges, these are made from a selection of Strainless Steel sheet, recycled Bandsaw blades and Steel crate banding, the four on the left are made from 1.4mm Stainless Steel sheet, the top three on the right are made from the back portion of  bandsaw blades which is 0.9mm thick, the next one down and the bottom one are made from Steel Banding which is 0.63mm thick, with the two remaining made from the 0.9mm bandsaw blade, the length of most of my gauges is 130mm (5") this I find the best and most comfortable size for most uses. the last one in the set is only 75mm (3") long. the widths vary from 6mm up to 53mm in this set and all the corners are rounded.


This next set is made from hard Plexiglass; about 2.7mm thick, this was one of the first sets I made; and it was a chore to shape them as are all are feathered to a fine edge on both faces.
these vary in width from 25 - 65mm  the largest one being 150mm long the rest are 130mm long.


This next set is one from Jann's in the US, I bought a couple of these just to check out what was commercially available.
The gauges are molded from plastic, all the gauges are 150mm long and vary in width from 17-73mm.
the edges of the gauges are rounded but the corners a still pretty square, these are cheap and chearful and great if you don't want to; or can't make your own gauges.


These next gauges are some I made for use during Net Making workshops, these are all made from 0.63mm Steel banding, are 130mm in length and 32mm in width, the blue black colour is from heat treating and can either be left as is; or polished as in the second from last gauge in the picture. this and the last one are 19mm in width.


These next two Mahogany gauges are all that are left from a batch I made as workshop hand outs, off cuts from making my Sailmakers Bench, these are 41mm in width; and are tapered to a thin edge across the whole width.


The last is a set of spare gauges, the first two being rather thick 2mm  Stainless Steel sheet which were a  little heavy to use for any lenth of time. the next few are some of the workshop gauges which have been polished up, some Bandsaw blade gauges, Stainless Steel Strapping, and a guage made from Ash which has an eliptical form across the width.


Portable Bench Clamps.

I made these clamps so that I would be able to make nets or hold work shops any where without having to worry about finding places to attach the net being made.

Here you can see how a  a bag net is attached to the clamp using a swivel attchment and Stainless Steel button. the leather chaffing pieces are slid over the Stainless Steel post and are screwed to the clamp.


Here is a double screwed clamp, this one I now use as the base for my Netted Xmas Tree.


Net Making Buttons.

For want of a better name, these buttons are used by inserting the the button and loop though a grommet starting ring of meshes, and hold the net whilst making a cylindrical bag net, the use of a swivel makes for ease of netting.


A Cast Net Making loop.

This wire loop and adustable length lanyard; I used when making a cast net.
All of the starting meshes are held on the wire loop, which can swivel around as you net, the small cam cleat holds the line at any length, and the lanyard is shortened as the Cast Net body grows in lengh.


More To Follow.

Take care,
Barry ;-)

Friday 4 March 2011

A “Single” Strand, Extended Version of ABOK #1389.


Yup’ that’s right a single strand version of the two strand knot found in “The Ashley Book of Knots” ABOK as it is known amongst us Knot Freaks.
The knot is shown in the book as knot #1389 in the Turk’s-Head section though not really a Turk’s– Head except in the definition that it is a continuous cylindrical braid.
This knot is related to ABOK #3054; a 17 strand half round sinnet.
ABOK #1389 is actually a two strand knot consisting of an underlying 6 part Turk’s-Head which is then interwoven with another 11 parts; making this a 17 part knot.
We have the very clever French man Norbert Trupiano to thank for working out the trick to make this knot work as a single strand knot, and Charles Hamel for publishing Norbert’s findings.
Please see Charles Website were you will be able to find more information.
The original Diagram as shown in ABOK has only 14 bights on the edges of the diagram, this extended knot as pictured above left uses a diagram with 98 bights on the edges of the diagram.
I was the second person in the world to have tied this knot in its extended single strand version?
And after tying it I can see why ;-)
Anyone else tried it yet?

How Did I Do It.
But first: I must say thank you to Norbert Trupiano for making this version of the impossible knot possible, and thank you to Charles Hamel for publishing the needed information to get a good start, and also thank you to Ognyan Savov and Alain Legeay for bringing this knot to my attention.
First off; I decided to make a small 50 bight version to see how it would work out and get a feel for the cord length.
The diagram I used was copied from ABOK and resized to suit making a pattern with 50 outer bights, which I pinned to a foam covered tube of the right size to fit the circumference of the joined pattern and then tied the knot you see pictured on the left in 1.2mm hollow nylon braid.
I started with about 8 meters of cord most of which was wasted after tightening the knot fully. The finished knot is about 40mm I/D.


Now for the real deal!
I resized and printed Norbert’s pattern to make a cylinder of 220mm with 98 outer bights on the pattern, I stuck this onto my foam covered form and put in the pins for the base knot, this I tied in blue nylon twine.
I then followed the rest of the pattern with the 1.2mm diameter, hollow Nylon cord.
See the picture below of this stage complete.


On its side you can see the 492 pins I used to keep everything in place ;-/ no easy task making this knot I can tell you!


After completing the interwoven part of the knot, I then replaced the blue nylon guide twine of the base knot with the white nylon cord used to tie the interwoven part, now making this a single strand knot.
You can see the completed knot on the form below, isn’t it funny how someone always manages to cut off your head in photos ;-)

Once we got this far; there was no turning back, I just had to finish it, so after checking for errors I pulled the pins and started the arduous task of tightening this beast up.
It took a fair while to get it down from 220mm diameter to just 75mm inside diameter, and after all that effort you can se the finished result below.
I started with around 20 meters of cord and after completing the knot I had just over 13 meters or so left.
I hope you like?
Please; if you do have a go at this knot; let me know how you get on.


Below: you can see the finished bracelet pictured with one of the gorgeous tools PJ made for me.